kordeko.com

Flexible tile is a modern solution for finishing insulated facades, combining the aesthetics of natural stone with ease of installation. In this guide, we will walk through the entire process of installing flexible tiles on a thermal facade — from surface preparation and priming to final washing and maintenance.
Why Proper Installation Technology Matters
An insulated facade is a multi-layer system. Installation mistakes can lead to:
- tile detachment
- cracks on the surface
- moisture penetration into insulation
- reduced thermal efficiency
Correct flexible tile installation ensures:
- long service life of the facade
- preservation of a continuous thermal contour
- a clean and durable appearance for many years
Base Preparation for Flexible Tiles: What Must Be Ready
Before starting the installation, the base must be:
- flat
- strong
- dry
- reinforced
Typical structure of an insulated facade:
- Load-bearing wall
- Adhesive for insulation
- Insulation (EPS or mineral wool)
- Mechanical anchors (dowels)
- Reinforcement layer (adhesive + fiberglass mesh)
- Primer
- Flexible tiles
❗ Important: tile installation is allowed only after the reinforcement layer has completely dried.
Step 1. Surface Priming
Priming is a mandatory step before installation.
Recommendations:
- for absorbent surfaces — deep penetration primer
- for dense surfaces — appropriate adhesion primer
- apply evenly using a roller or brush
Primer:
- binds dust
- improves adhesive bonding
- stabilizes the substrate
Step 2. Adhesive Preparation
For facade applications, use:
- frost-resistant, elastic adhesive
- suitable for exterior use
Consistency:
- slightly thinner than standard tile adhesive
- should adhere well to the surface
💡 Tip: prepare adhesive in small batches to prevent loss of working properties.
Step 3. Adhesive Application
The adhesive is applied using:
- a notched trowel
- tooth size 4–6 mm (depending on tile texture)
Important:
- apply an even layer
- avoid gaps and voids
- do not spread adhesive over a large area at once
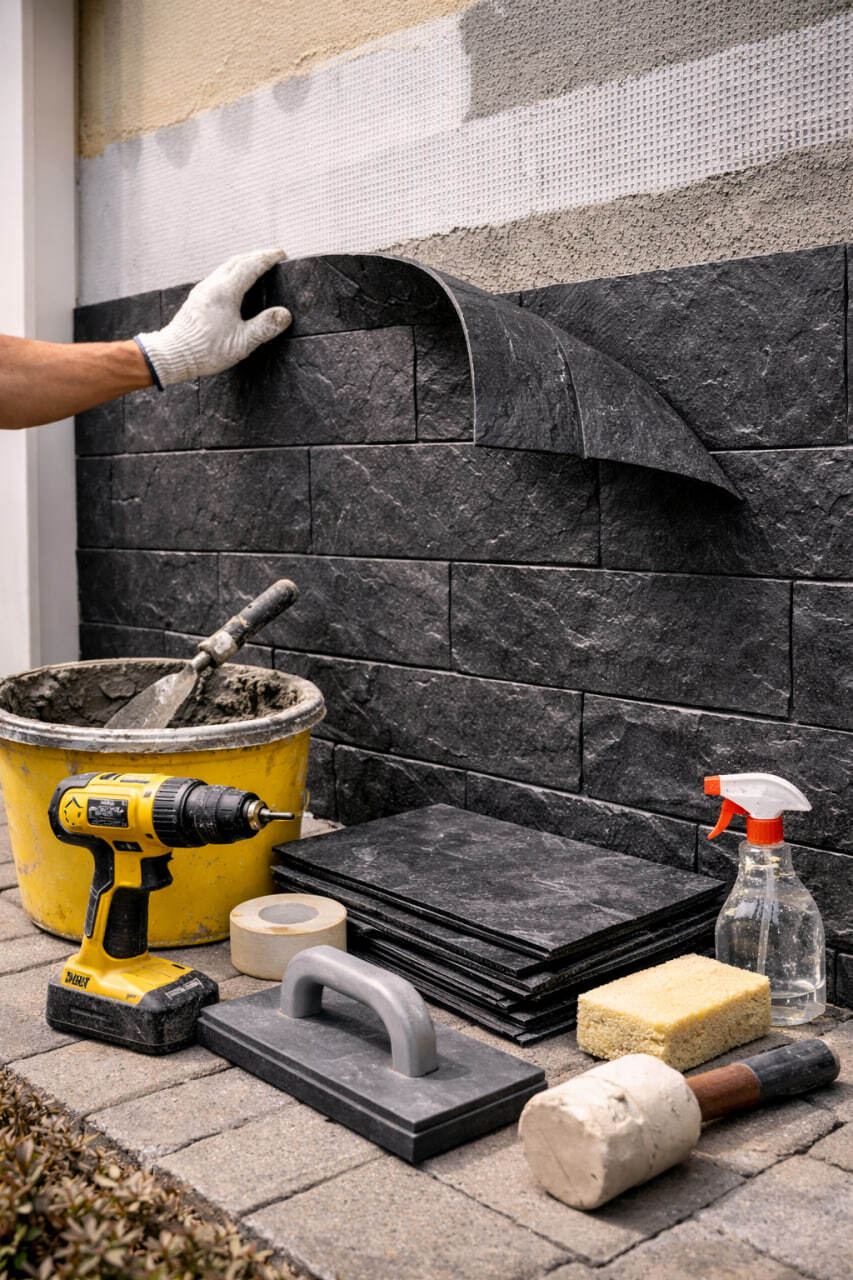
Step 4. Installing Flexible Tiles
Installation process:
- place the tile onto the surface
- firmly press using a flat trowel
- completely remove trapped air
- trim elements on-site as needed
Recommendations:
- mix tiles from different boxes for a natural pattern
- regularly check level and geometry
- remove excess adhesive immediately with a sponge
Step 5. Joint Formation and Quality Control
After installation:
- joints and seams are inspected
- geometry is corrected if necessary
- surface is checked for voids
Flexible tiles do not require traditional grouting — joints are formed during installation.
Step 6. Drying and Facade Protection
After installation:
- protect the facade from rain and direct sunlight
- avoid mechanical loads
- follow adhesive temperature recommendations
Average initial drying time is about 24 hours (depending on conditions).
Step 7. Final Cleaning and Maintenance
After complete curing:
- the facade can be gently washed with water
- use a soft sponge or brush
- avoid aggressive chemicals
💡 Thanks to the hydrophobic effect of flexible tiles, dirt does not penetrate the surface and is easily washed off.
Common Mistakes When Installing Flexible Tiles
❌ Installing on a damp surface
❌ Skipping the priming stage
❌ Applying too thick or too thin adhesive layer
❌ Poor tile pressing
❌ Working at unsuitable temperatures
Avoiding these mistakes significantly extends the service life of the facade.
Why KORDEKO Flexible Tiles Are Ideal for Insulated Facades
Flexible tiles by KORDEKO:
- do not overload the facade
- do not require metal substructures
- preserve thermal insulation
- are resistant to moisture, frost, and UV radiation
- are suitable for complex architectural shapes
Step-by-step installation of flexible tiles on an insulated facade is a clear and manageable process when the technology is properly followed.
Key success factors:
- high-quality base preparation
- correct adhesive selection
- careful installation
- compliance with drying conditions
The result is a warm, beautiful, and durable facade without cracks or complicated maintenance.
KORDEKO Contacts
📱 Phone: +37368140333
🌐 Website: www.kordeko.com
📧 Email: kordeko.md@gmail.com